There was a clog deep down in my bathroom sink and, after unsuccessfully trying a liquid unclogging product, I realized I had to call my apartment maintenance person to come snake the problem. And while I do see how satisfying it must be to use a snake to break up a pipe clog and hear the water drain unobstructed, I personally don't want to invest in a snake.
Also, a snake is not really proactive in the world of clogs. So how can I stop the hair before it becomes lodged in the pipe? I was going to purchase a sink suction cup hair catcher, but my local Ace Hardware didn't have it on hand. They did have a Sink Shroom, but I didn't want to pay $15 for it and also no longer be able to plug my sink.
Impatience set in -- I couldn't even handle the 2-day Prime waiting time for the suction cup hair catcher -- so I just decided to see what I could make from the hallowed halls of my local Ace Hardware. I told an employee there what I had in mind and, after thinking about a few ideas, I came home with the following:
(Quick thank-you to the helpful Ace Hardware employee who thought to show me the dryer lint snare. I love repurposing stuff!)
MATERIALS:
Sink stopper (if yours blew up and broke like mine did)
Lint snare (not the aluminum kind)
Cable ties (check to see if they are already included in your lint snare pack)
This video will help you sort out the ball/pivot rod part of your sink.
Turns out I didn't need to buy additional cable ties -- there were two included in the lint snare pack.
Broken sink stopper
Oh -- I didn't tell you why I needed a brand new sink stopper. A couple of days after I had tried the liquid drain unclogger, something down in the pipes exploded! I had left the stopper down, left the house, and when I came back, the sink stopper was sitting in the sink, outside of the drain, and my sink was covered in silt from the pipes! I don't know if this had anything to do with the liquid I poured down the drain, or if another apartment was having clogged and this was a result of someone else trying to solve the problem. In any case, my stopper was broken! The little plastic loop that the ball rod hooks into was busted!
1. Place the stopper in the lint snare bag so that there is excess over the top. The excess will give you some wiggle room for the next step.
2. Weave a cable tie through the mesh, right underneath the gasket.
Fasten the cable as tightly as possible. Trim excess cable.
3. Trim off the excess lint snare from the top.
4. Billow the lint snare out a bit from the middle of the stopper and, again, weave the second cable tie through the mesh and around the bottom part of the stopper, above the ball/pivot rod loop.
Trim excess cable.
Looking down into the drain you can see the end of the ball/pivot rod that sticks through stopper loop.
5. Cut a hole in one side of the lint snare in front of the stopper loop so the ball/pivot rod will fit.
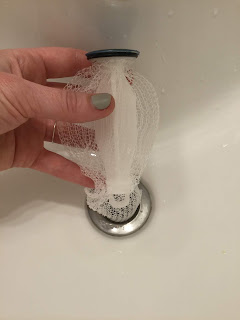
6. And the stopper is ready to be put into place!
The finished product!
7. Clean out the lint snare periodically. It'll be better than dealing with a legit clog, right?
Burt in his modified pack, with the panel zippered, as we ride the bus. Photo credit: Max Sparber
Let's take a moment to talk about a pet carriers, shall we? I'm first and foremost a pedestrian who sometimes takes the bus and train. When I first adopted Burt, he was 30 pounds! He was16 pounds overweight and didn't have much endurance for the long walks I take (don't worry, he is now a healthy, energetic 14-pounder), so I would frequently end up carrying him. I ended up buying a BestPet Convertible Stroller, which is a wonderful product, but it limits our mobility.
I wanted hands-free movement! I wanted significantly less bulk for riding public transit!
As a dog owner, but not a car owner, it is important -- and sometimes necessary -- to be able to bring my little fella on public transit with me. On Twin Cities Metro Transit, animals are required to be in an approved carrier. However, in my experience, approval varies from bus driver to bus driver. I found this out the hard way when Burt and I were denied passage one day and had to book it on foot a few blocks to make sure we didn't miss our train.
I researched pet slings, cute but impractical totes (those straps would be murder on my shoulder!), and pet backpack after pet backpack. Even if the design was right, Burt far surpassed the weight recommendations. Honestly, just for a second, I even considered human baby carriers...
Even though my intention always was to find a pack that I could wear on my front, finally I just went to Target to look for a regular school backpack. Back to basics, right? But it would have to be something that I could modify if I needed to.
And I found The Perfect Bag.
What made this Embark brand backpack The Perfect Bag? The jar-top opening! And look at those luxuriously wide shoulder straps. When Burt peeks his head and front paws out of the top of the bag, I don't have to worry about the zipper unzipping under his own weight and dumping him out onto the ground. Another plus? There is a pouch and padding for a laptop inside the main compartment. If I have to use this on a hot day, I simply slide in a cooler pack similar to this one to make sure Burt stays cool!
99.9% of the time Burt rides in the pack when it is fully unzipped, as pictured.
And, just to quickly note, 99.9% of the time Burt rides in this pack when it is fully unzipped. His head is uncovered and he usually rides in a sit-up position with his front paws resting on the rim of the opening. But it is big enough for him to also fully sit in the bag with just his head facing forward out of the opening.
Also, how great is it that "bark" is part of the brand name?
When it finally happened that I was denied a bus ride, I realized that some drivers are only going to allow Burt to ride the bus if his head is covered (I assume to eliminate any possibility of biting). I had to confront the fact that sometimes I would have to be able to close the bag over Burt's head. But this backpack didn't have mesh -- the proper ventilation -- to safely do that. But it definitely had the right structure to support making a change.
It was time to mod.
Materials needed:
Backpack with jar-top opening
Durable mesh (I used leftover pet-resistant screen from my parents)
Scissors
Sewing materials
1. I cut out a panel from the lid, making sure to follow along and keep the seam.
2. Cut out a fairly large circle of screen.
It's important to start out quite big -- bigger than you may think -- as this allows for plenty of wiggle room for your dog's snout (see photo at top of this post). Make a cut from the outside of your circle of screen to the center. This will allow you to easily shape a roomy cone with the screen.
TIP: Take a moment to put your creature in the pack (or an object that is approximately the same weight), zip the lid shut, and see how the screen cone/bubble will fit over the opening. The weight will give you a good idea of how much slack to give in order to sew the screen onto the lid.
Once you get the cone shape you like, sew it into place.
3. Rather than sew the outside edge of the screen circle directly to the opening you made in the lid panel, you'll want to gather the edges first.
Trust me. In the long run it'll make sewing the cone/bubble onto the panel much easier.
Gather the outside edges of your cone. It is the technique used to make ruffles on a skirt, but it works like a charm for this! TIP: Don't gather too tightly (though, if you do, it's easy to fix), keep the opening big enough to cover the opening in your panel, but also big enough to accommodate any stretching that may occur in the fabric from the weight of your animal in the pack! The finished shape may remind you of a shower cap.
4. Again, if the creature who will be riding in the pack is around, put him/her in the pack, zip it, and double check to see how the screen bubble will fit over the opening while accommodating the creature's weight.
5. It's time to sew!
For my own personal aesthetics, I positioned the part of the cone that has the overlapping screen on the bottom, the area that would be under your creature's chin.
Sure, I love this pack, but what about Burt?
Burt LOVES this pack. Taking this pack out of the closet is always the very last step in preparing to go out because he gets so excited the moment he sees it. He tries to jump right into it! When we are out and about, he is alway sure to let me know when he wants to get out and walk and when he is ready to hop back in to take a break.
Here is some video to help you get a better idea of the finished product:


